How to do the Industrial Technology (Engineering) Folder
The Injection Moulding Die
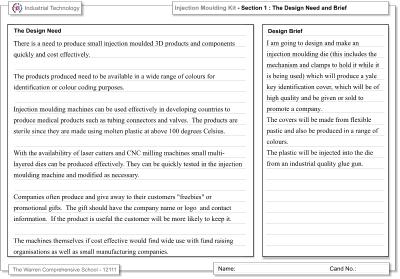
Section 1- The Design Need and Design Brief. [4marks]
The design problem is set by the examination board (OCR).
This year we are using The Injection Moulding Die and The Business Card
Embossing Tool.
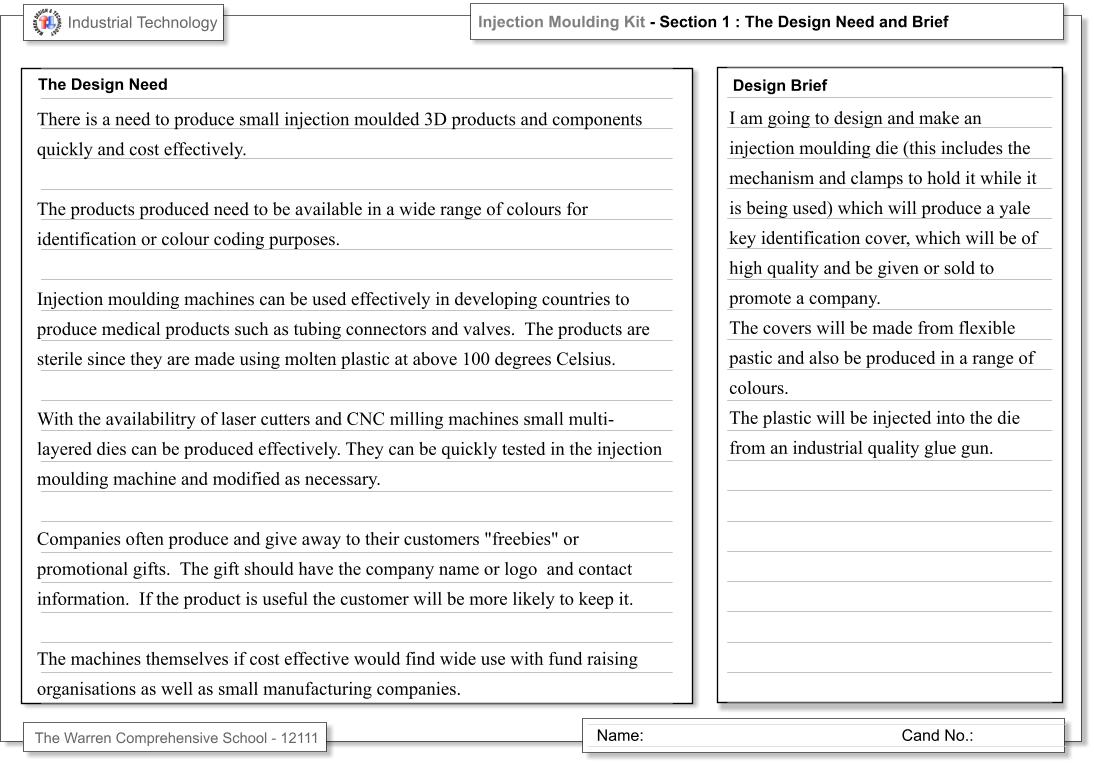
Write about the Design Need using the information below.
The product will be three dimensional, such as a container, a Yale key identifying cover or connecting piece for a tubular structure.
For testing and evaluating an ordinary hot melt glue gun can be used to make prototype components using PVA hot melt glue.
Include the answers to these questions which must be answered in full sentences:-
- What is the product?
- Who is it for?
- Why is it needed?
- Is this a cost effective way of making the product?
- Will the product be of high quality?
- Will the product be sold or be part of a sales promotion?
- Will clients and or customers want the product and will they use it?
The Design Brief – I am going to design and make an injection moulding die (this includes the mechanism and clamps to hold it while it is being used) which will produce a -----------------------------, which will be of high quality and be given or sold to promote ---------------------------------.
 Click on the image below to see an example page - Page 1 Design Brief Click on the image below to see an example page - Page 1 Design Brief
Section 2 – Research, Existing Products and Specification [12 marks]
Research
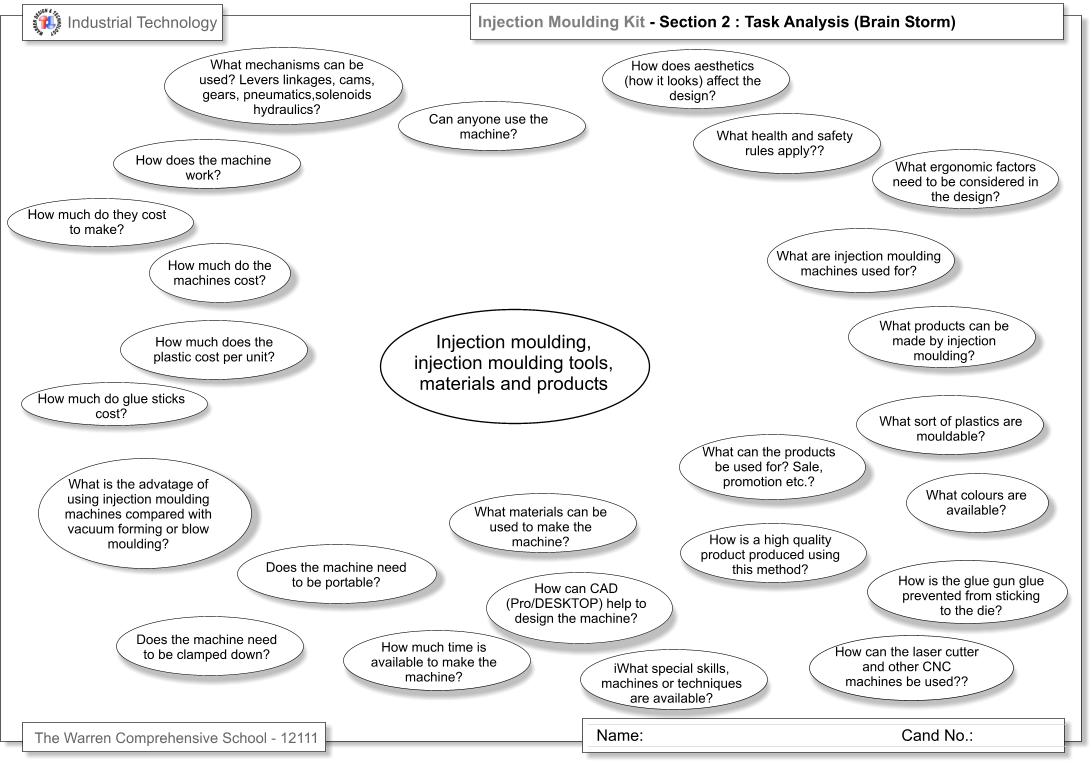
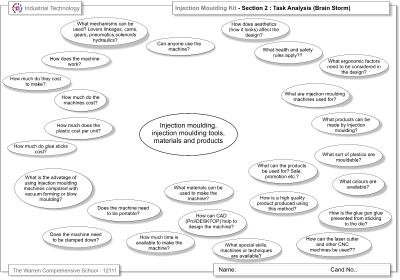
Produce a brainstorm or Task Analysis - ask questions about every aspect of the process, the materials, the product and the users. Arrows can be used to link the chart together.This will help you research thoroughly..
Click on the image below to see an example page - Page 2 Task analysis.
Use the internet and school network to research injection moulding.
Focus on Plastics is on the school network.
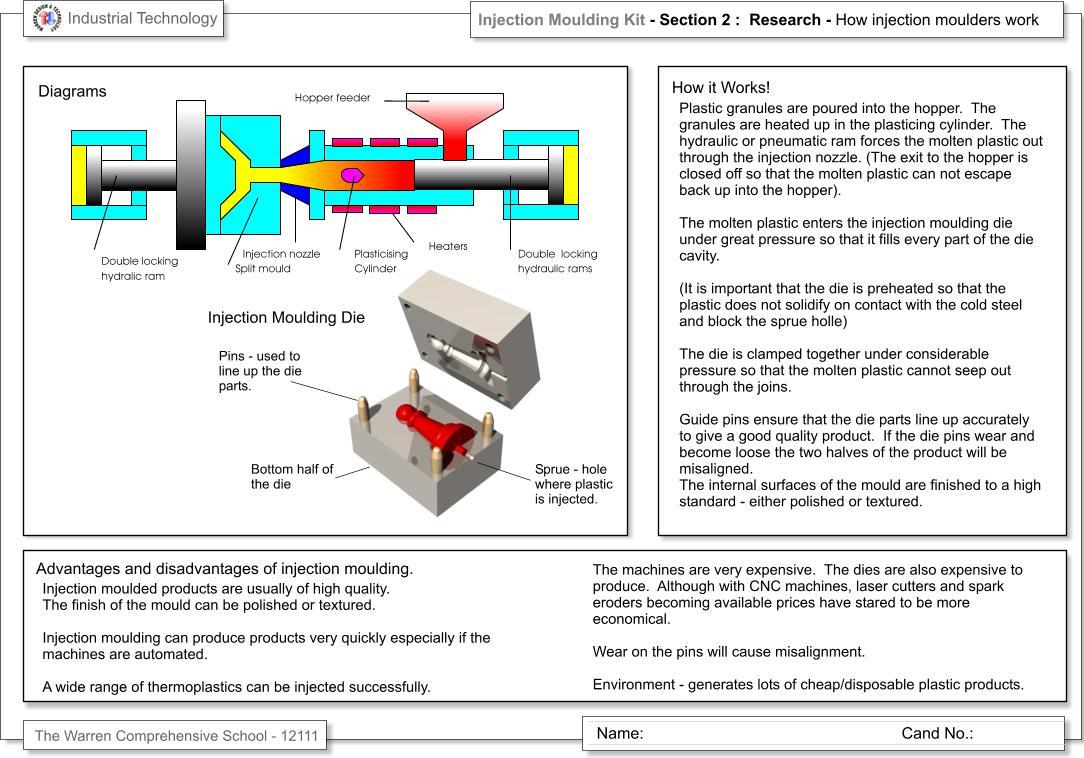
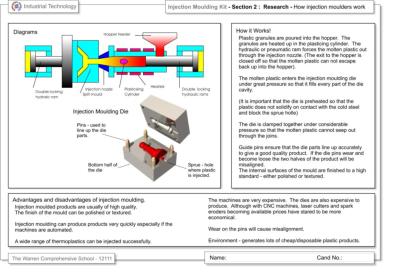
In the section - How it works! - State how injection moulding is widely used in industry to produce high quality products for a range of applications. Explain how an injection moulding machine works. Use diagrams and notes from the web or “ Focus on Plastics”. Useful web sites:-
http://www.technologystudent.com,
www.the-warren.org,
www.plastiquarian.com/,
www.dogma.org.uk,
www.kpplastics.co.uk
What are the advantages and disadvantages of injection moulding over other methods of manufacture? Compare with vacuum forming, extrusion, fabrication (making products up from standard sections and joining them together), blow moulding, casting, CNC machining. Consider Costs, time, accuracy, detailed and complexity of the product and quality of finish. All of these score highly for injection moulding except the cost of making the die plates which can be very expensive indeed!
Click on the image below to see an example page - Page 3 How it Works
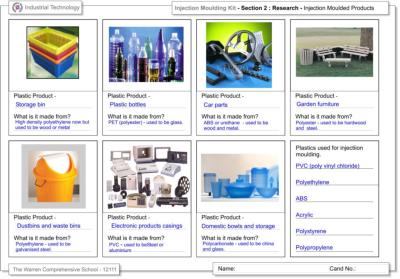
Find images of injection moulded products (use Yahoo or Google image search) and cut and paste them. Examples are casings for televisions, computer equipment and other electrical products, storage bins and dustbins, casings for pens, CD cases, plastic toys, plastic suitcases and briefcases, plastic construction kits including Lego ™ etc. For each product explain what the plastic casing etc. is for and how it has advantages over alternatives which may have been used. E.g. plastic toys versus wooden toys, leather or fabric cases. Metal bins or cases v. plastic cases.
List plastics which can be injection moulded. E.g. polyethylene, PVC, polypropylene, polystyrene, ABS, acrylic, i.e. most thermoplastics no thermosets.
Click on the image below to see an example page for - Page 4 plastic products
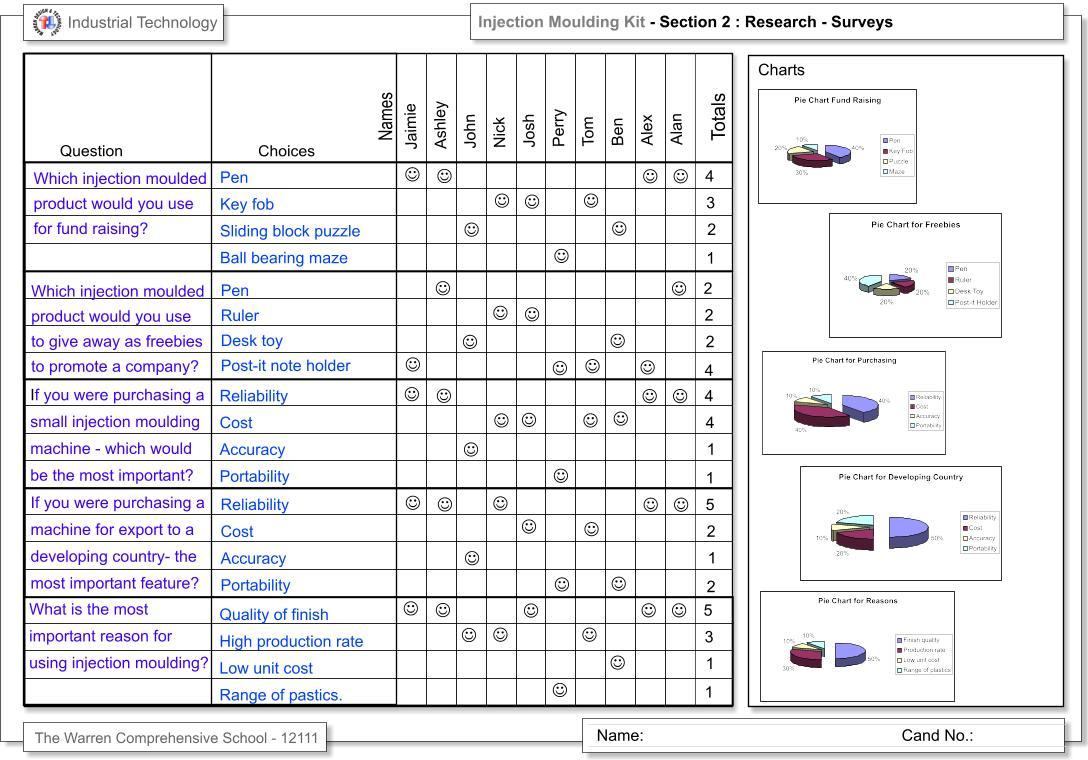
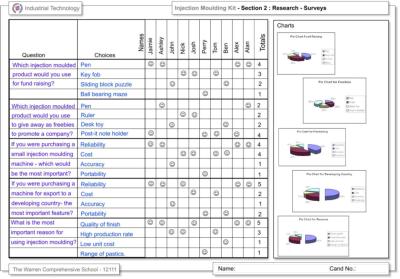
Complete a survey about how small injection moulded products and small injection moulding machines are used or could be used by consumers and users.
Click on the image below to see an example page for - Page 5 surveys
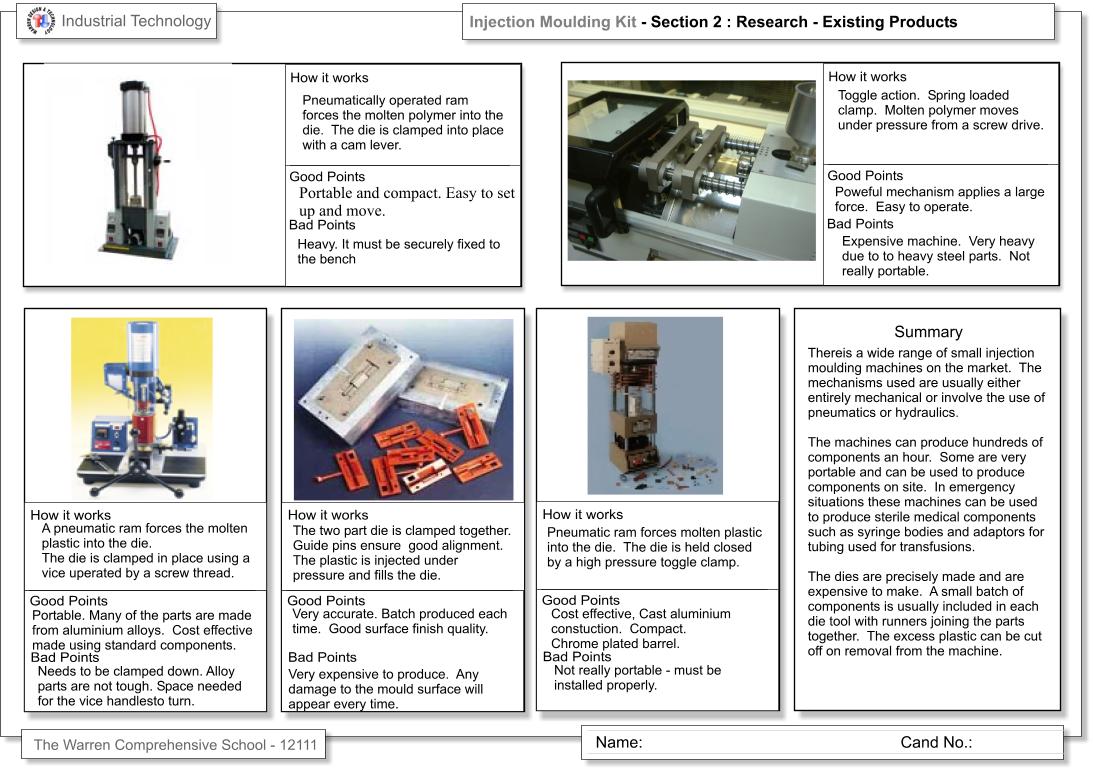
Existing products. Cut and paste images of machines and dies and explain how they work. Paste at least five images and descriptions of injection moulding machines. Give at least two good points and two bad points for each. Here are some useful web links for small injection moulding machines.
www.abplasticinjectors.com/,
www.ray-ran.com,
www.mcp-group.com,
www.pcn.org,
www.dsm.com,
www.sovrin.com,
www.morganindustriesinc.com.
Click on the image below to see an example page - Page 6 Existing Products.

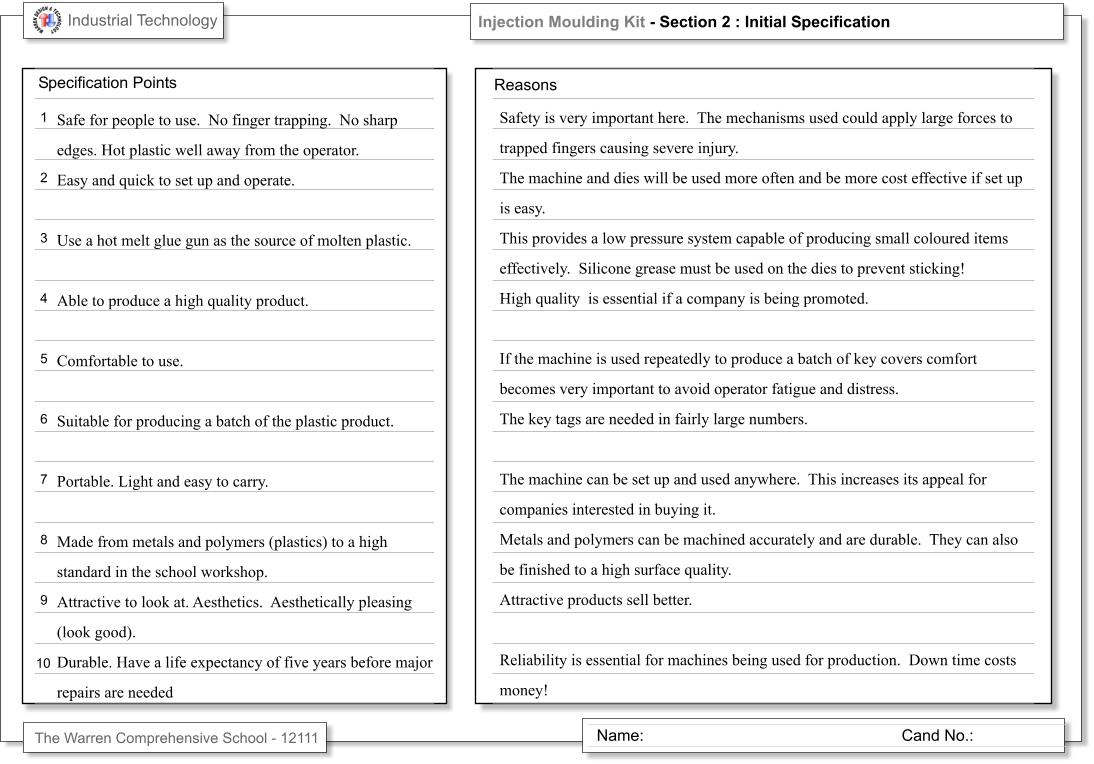
Specification
A specification is a list of all the things that your product should do.
The product must:
- Be safe for people to use
- Be easy and quick to operate
- Be able to use Hot Melt PVA glue from glue gun
- Produce a high quality plastic artefact
- Be able to interchange die to accommodate different designs of artefact
- Be attractive to look at
- Be comfortable to use
- Be light enough to carry and store
- Have a 5 year life expectancy
- Be made to a high standard
- Be made mainly in metal plus plastics (polymer)
- Be suitable for batch production (must be included)
- Ensure quality of artefact throughout the production of a batch (must be included
- Add any other points of your own to the list – such as must produce little waste (environmental).
Enter the points you think are the most important. For each point explain how it will be achieved or why it is important. (Refer to your research).

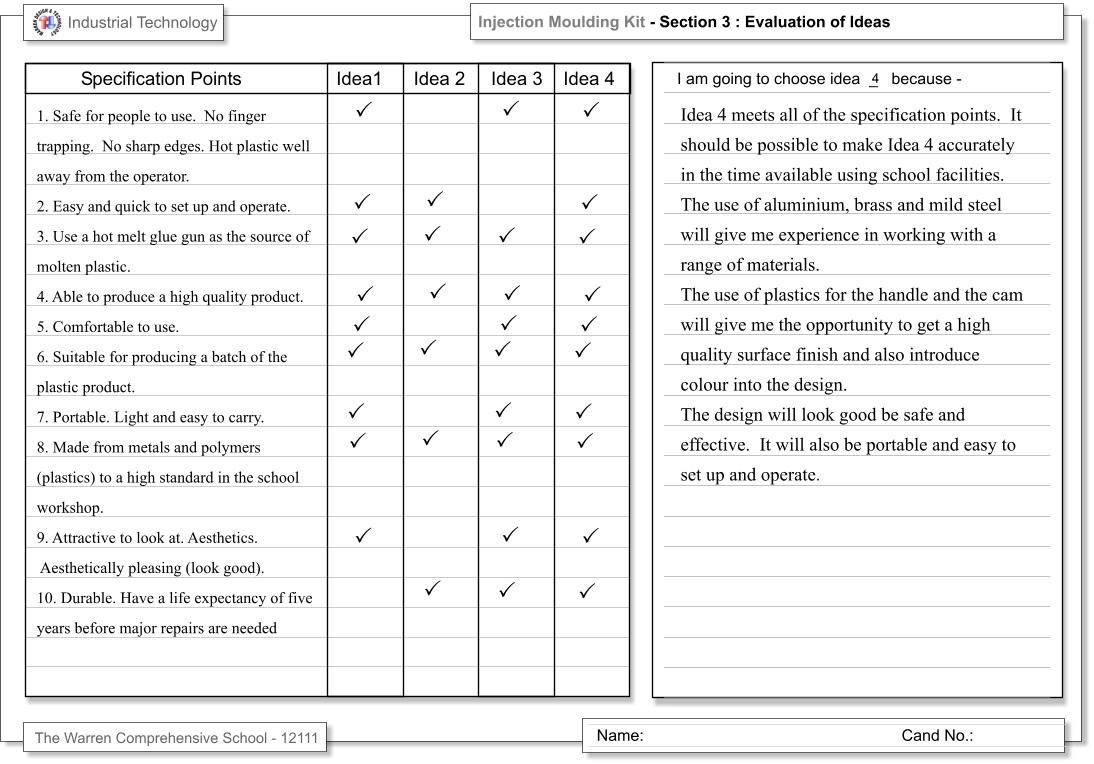
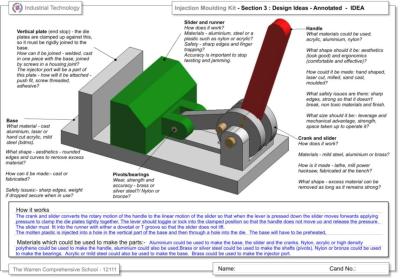
Section 3 - Design Proposals – IDEAS 12 marks
[There are 4 Marks for a wide range of ideas and 4 Marks for the quality of the drawings and 4 marks for evaluation of ideas]
First Design ideas – produce a range of quickly sketched ideas based on mechanisms around the workshop and research on the Internet. Add colour and labels to enhance these sketches.
Draw four ideas for your injection moulding tool. (You can use the photographs of your models instead of sketches.) Make them as different as possible. Use cams, screw threads, wedges, powerful springs, weights etc. to come up with different ideas but include the one you are making as one of the four. If you have made models take photographs and paste them onto the page.
Try to label five parts of each design. E.g. handle, pivot points, base, lever, side plates, spacer, washers, screws, spring etc.
For each label ask questions such as - What does it do? What material could it be made from? Should the component be made, bought, made using a CADCAM system (CNC lathe, CNC mill or laser cutter). What size is it? Does it have to be strong? What colour, shape can it be (aesthetics)? Is there a safety issue with this part? Ergonomics (handle comfort)?
Click on the image below to see an example of - Page 9 Ideas
Models - Take photographs of models you have made and paste them onto a design ideas page. Explain how the models work.
Pro/DESKTOP - Draw some of your ideas using Pro/DESKTOP and paste them onto a design ideas page. You will get extra marks for using CAD here!
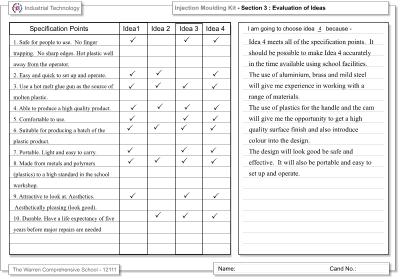
Evaluation of Ideas - Evaluate each idea against the specification. Explain why you have chosen the final idea. [4 Marks]
Click on the image below to see an example page - Page 10 Evaluation of Ideas
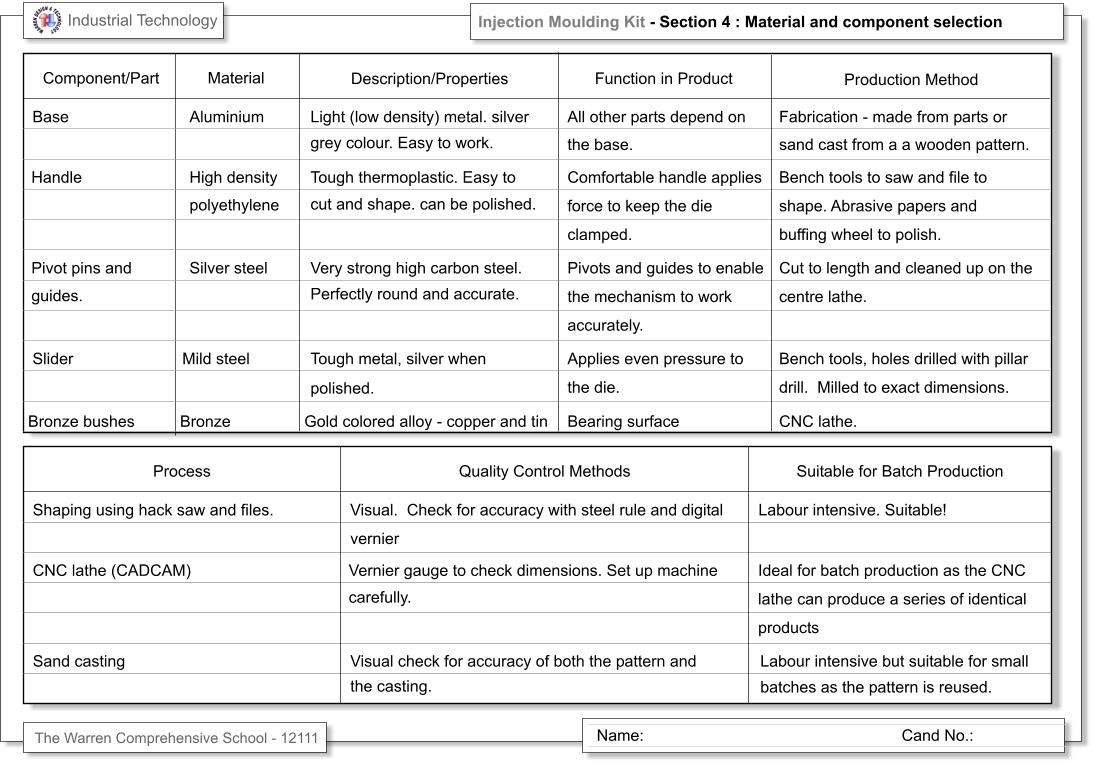
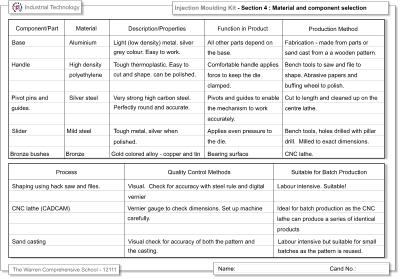
Section 4 – Product Development
Complete the tables on the Materials and component selection sheet. Production methods are for school workshop production.
Click on the image below to see an example page - Page 11 Materials and components selection
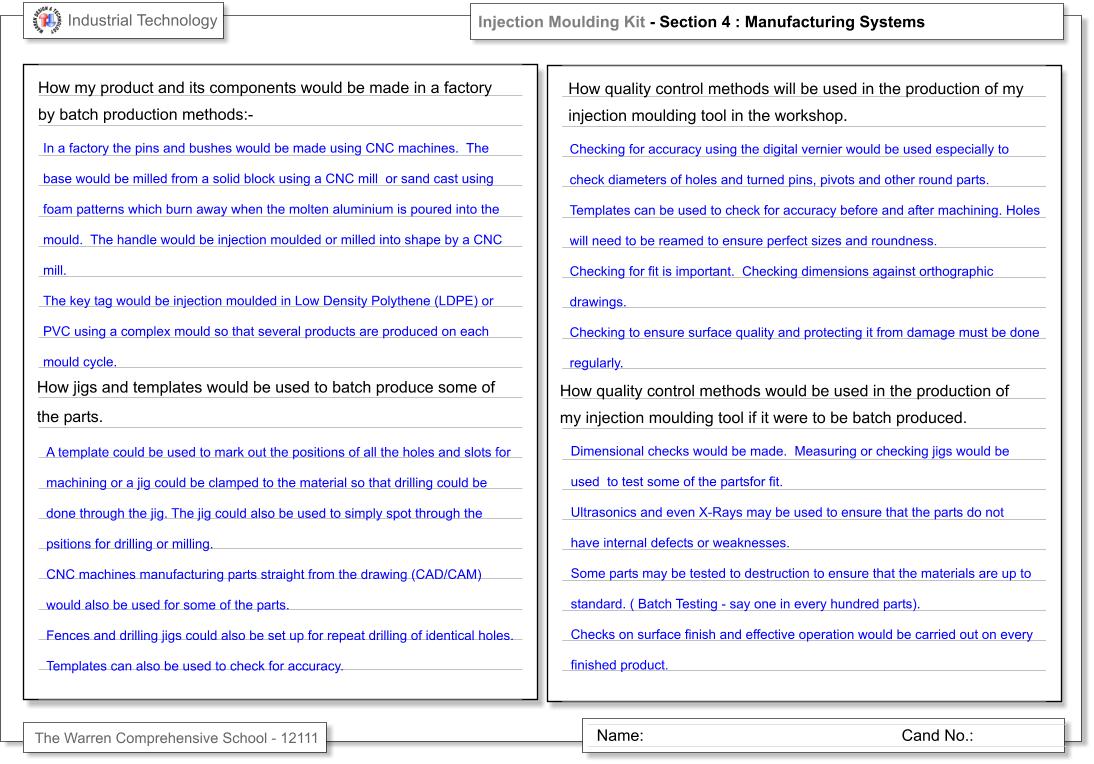
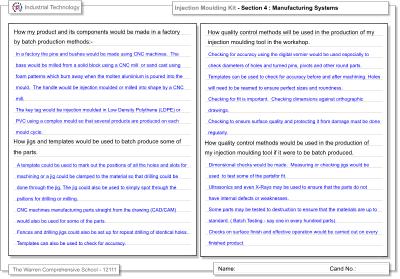
Answer these questions on the sheet - Manufacturing Systems - How would the tool or its components be made if it were made in a factory as a batch or mass produced item? How can jigs and templates be used to manufacture in quantity? What quality control system would be used if the injection moulding tool was to be made in a factory.
Click on the image below to see an example page - Page 12 Manufacturing Systems
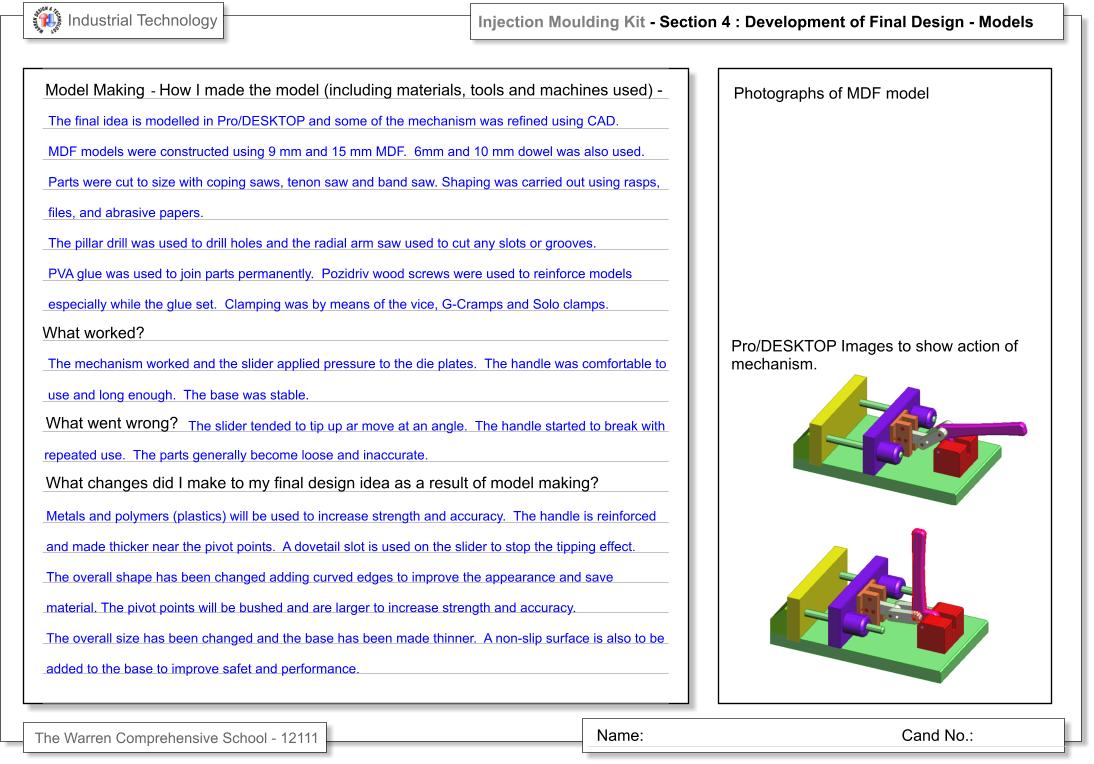
Write a paragraph explaining how the design was modelled – in MDF or card and using Prodesktop. (Print picture showing stages of the animation). Write a sentence or two stating that the design was perfected by changing parts of the design such as the shape of the levers, cams or handles and this was tested by modelling in Prodesktop or on the MDF model.
Click on the image below to see an example page - Page 13 Models

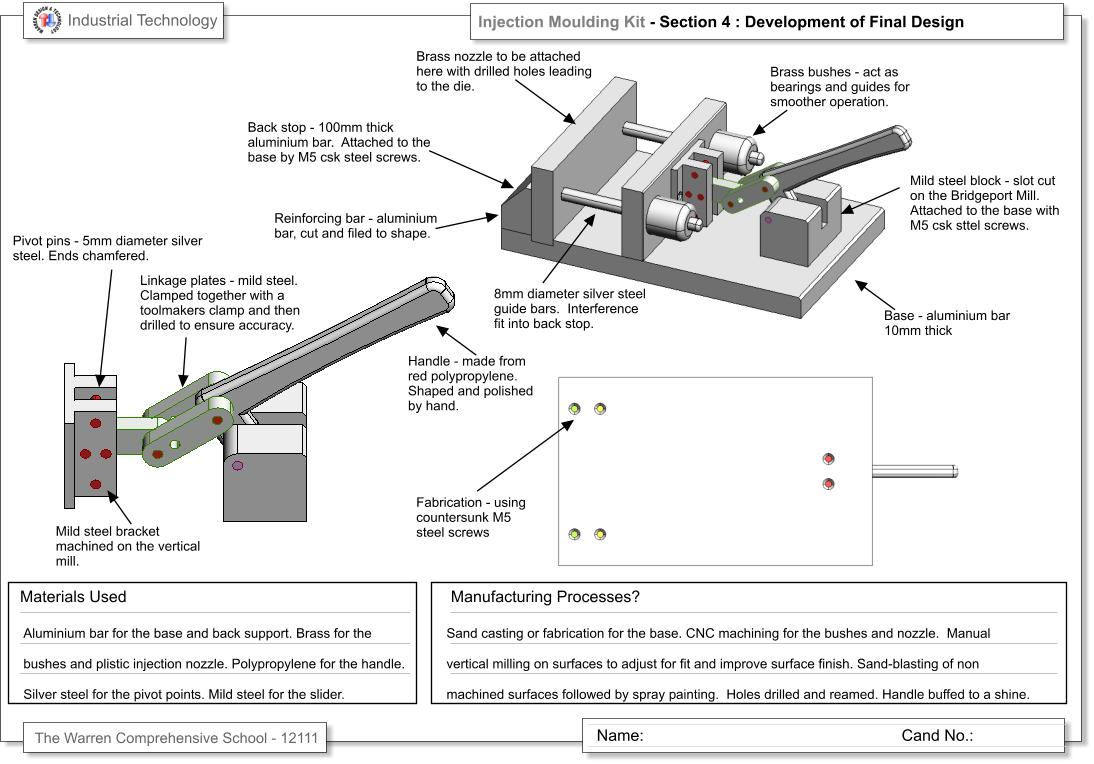
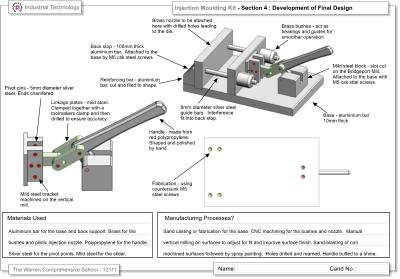
Answer all the questions you asked earlier for your chosen design. Do this as extended labels on a carefully drawn diagram of your chosen solution. Plus write extra notes where needed.
Click on the image below to see an example page - Page 15 Design Details
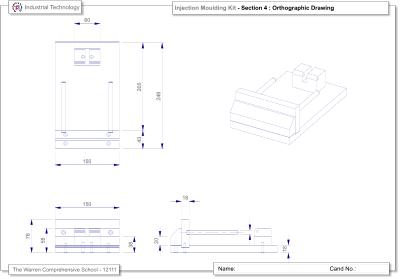
Print out orthographic drawings from Prodesktop of individual parts with dimensions (measurements).
Click on the image below to see an example page - Page 16 Orthographic Drawing
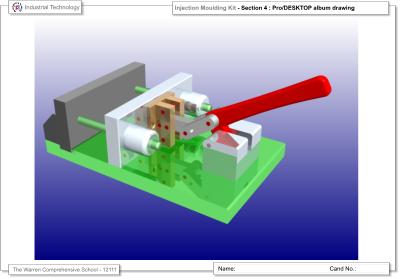
Print out an album drawing of the final design.
Click on the image below to see an example page - Page 17 Album
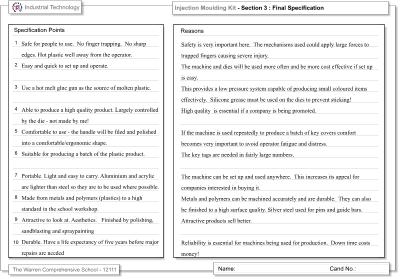
Write a short final specification. Make any changes as a result of your designs.
Click on the image below to see an example page - Page 18 - Final specification
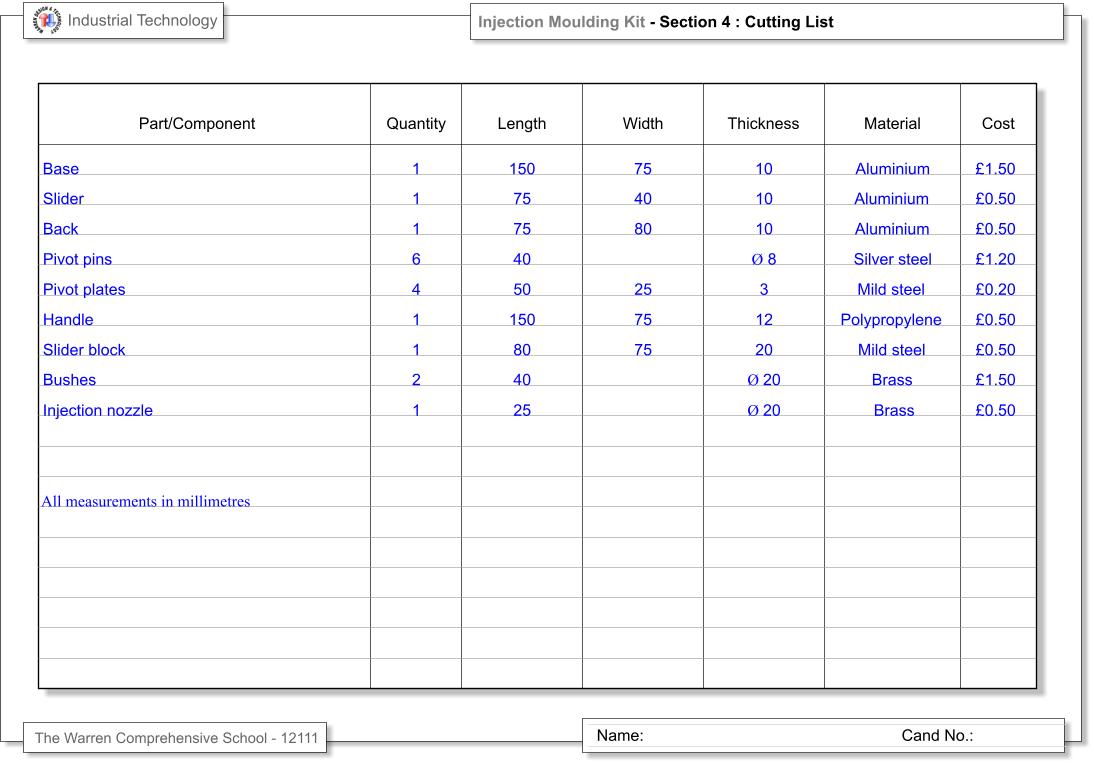
Complete the Cutting List sheet.
Click on the image below to see an example page - Page 19 Cutting List

Section Five - Product planning and realisation – 52 marks
Planning - draw up a list of the steps needed to produce your product. Include which tools are used and how parts are checked for accuracy and fit. [12 marks]
Your production plan should be a step by step plan explaining how you will make your product.
It should use sketches to illustrate some of the steps. It must include the use of specialist terms – the names of materials, tools, machines and other equipment/components.
It should include health and safety points at each stage throughout the plan.
It should include quality control checks at each stage through out the plan, checking for accuracy and fit.
You must include the times for each step
Realisation - Making to a high standard [40marks]
This is the most important stage for your coursework. You must make your product to a high standard.
It must be complete
It must meet the requirements of your specification
It must work It must be a quality product It must be ‘Safe to use’ It must have ‘Instructions for use’
Section Six - Evaluation and testing – 8 marks.
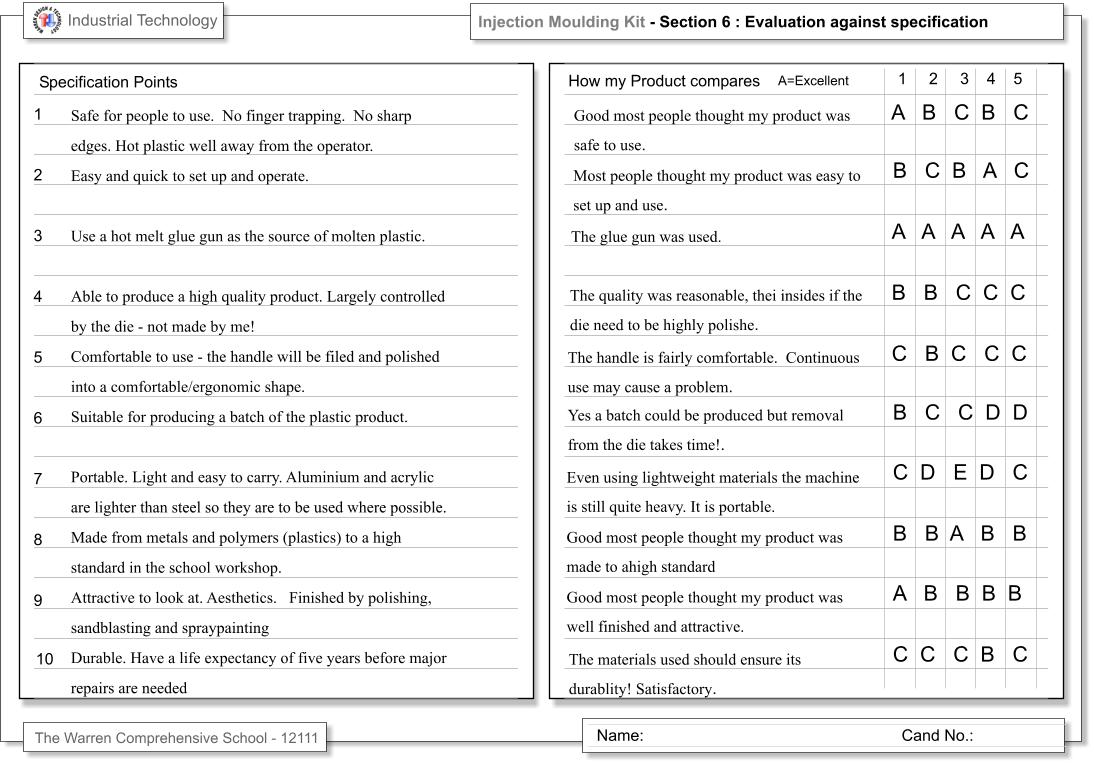
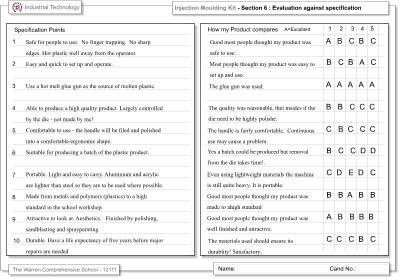
List the specification points and ask each person how your injection moulding tool did. Record the results (there is a space for this on the evaluation page - people 1-5)
Score A = Excellent, B = Good, C = Satisfactory, D = Need some improvement E = Poor.
Click on the image below to see an example page - Page 21 Evaluation against Specification
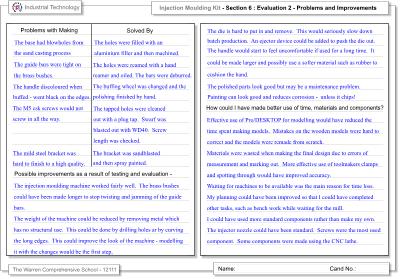
Answer these questions:-
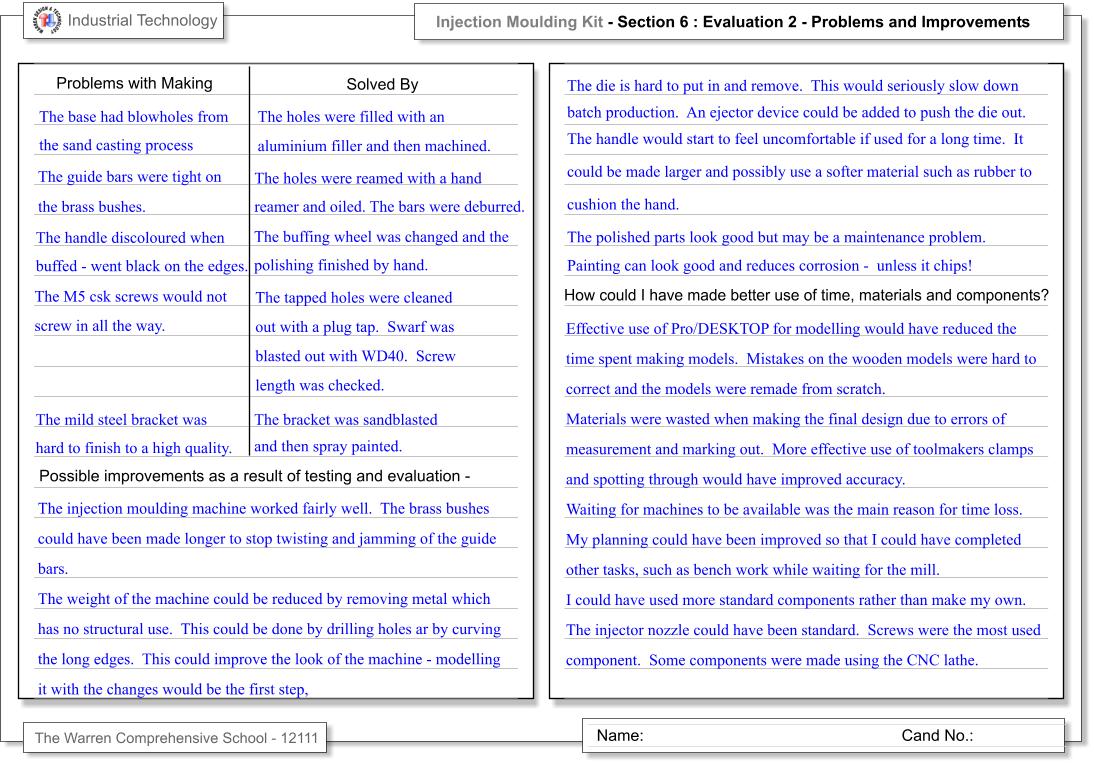
What went wrong with the making?
How did you overcome the problems?
If you were making it again what improvements would you make?
Did you make good use of time, materials, and components? The answer is how you could have made better use.
Click on the image below to see an example page - Page 22 Evaluation Improvements
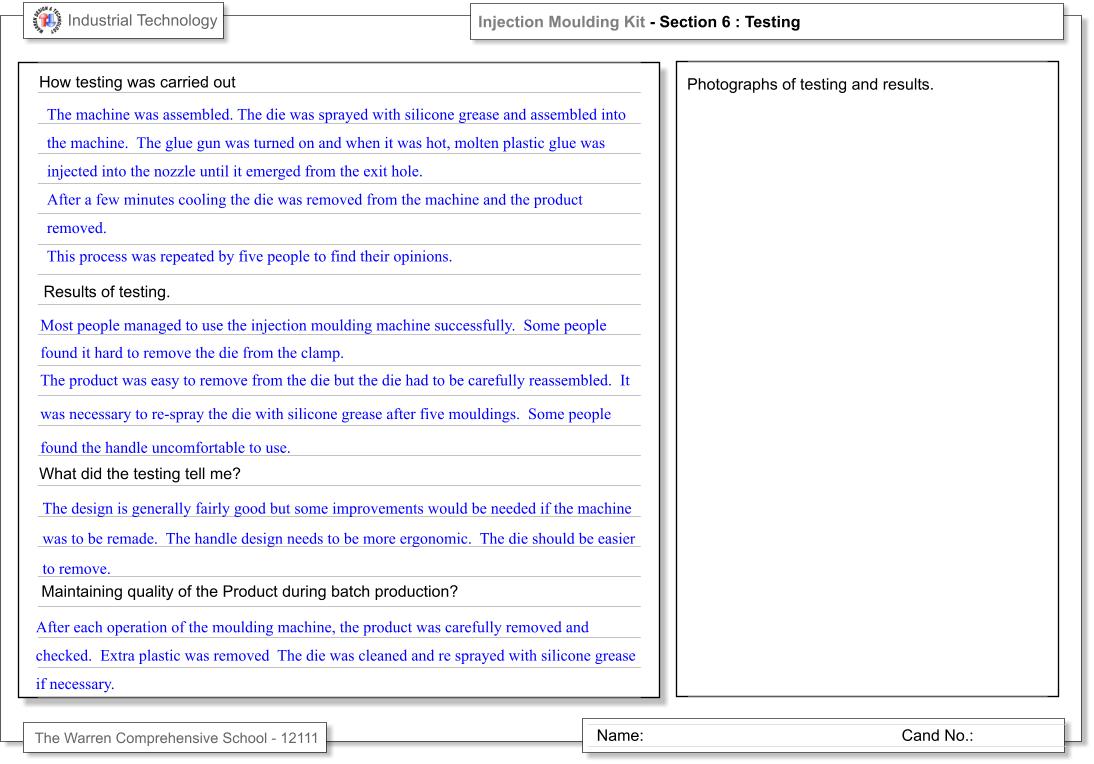
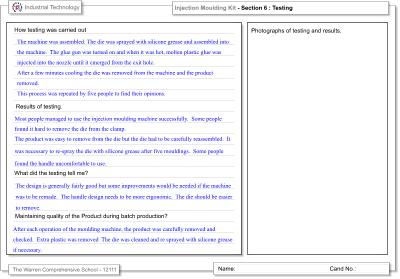
Quality of the product your tool makes or helps to make – How did you test this? How can you make sure that quality is maintained? (Jigs or guides to support the material being drilled or embossed. Add sketches to illustrate these options).
Write a paragraph explaining how the tool was tested (refer back to the original information from the exam board).
Take photographs of your product being used or tested by five people.
Click on the image below to see an example page - Page 23 Testing
|